Tuesday, May 29, 2012

Ch 6: Heat Duct & Seat Back Brace (Part 2 of 3)

Heat Duct Assembly
The heat duct goes together pretty easy however it was a little unwieldy while floxing the 3 parts together.  They are 40.75" long and when you assemble them they are only glassed on one side with 2 ply UND...they are kinda floppy at this stage.  I used the nail method in the plans as well as some spacers for the open bottom for holding it together nice and square during cure.  For the curve at the front of the heat duct, I used some slight clamp pressure against two large craft sticks (tongue depressor, epoxy stirring stick) to hold it in place while curing...worked perfectly.

Safety Belt Attach Point
Before glassing the exterior of the entire part, a 5/8" AL tube is installed with flox and will provide one side of the safety belt attach point.  I floxed in the tube and then performed the 7 ply reinforcement immediately following.  This allowed me to make a nice smooth rounded top over the tube.

Seat Belt Attach Point Installed into Heat Duct


Glassing the Heat Duct
When glassing the exterior of the heat duct, I measured out a rectangle of 2 ply BID about 10" x 43" on aluminum foil.  I supported the heat duct off the table using a 2x4 turned on it's side and inserted into the bottom of the heat duct.  That way I could let the glass on the sides hang while curing.  After wet out, I back rolled the glass and foil onto an old cardboard roll (like what the glass cloth comes rolled on) and then rolled it out on top and down the middle of the heat duct.  I made the width of the glass so it would drape down each side and be easy to glass the entire piece at one time.  It worked pretty good...better I think than trying to put resin on  the vertical sides of the duct or turning the duct from side to side.  I had a few dry spots I had to fix but I'm sure that was because I wet out the 2 plys of glass at the same time and clearly missed some air.

Joining the Heat Duct to the Seat Back Brace
Heat Duct with extra .75" of
last-a-foam on each side
In the previous post I widened the seat back brace to get a larger map pocket.  My map pocket is now 3" wide which makes the total width of the seat brace 3.5"...too wide to fit on top of the 2" heat duct per plans.  So, I needed to widened the heat duct aft of where it passes through the seat.  I had some left over .75" last-a-foam which was perfect so I cut pieces to fit on each side and floxed them in place.  Be sure to trial fit all this in the airplane.  I must have went back and forth to the plane a dozen times making sure everything was right before I did anything permanent.

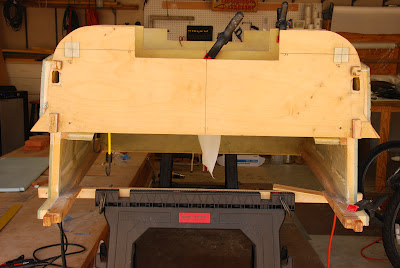
The pictures show the added foam with beveled front ends to match the seat back and how the seat brace will install on top when done.  The added foam will get glassed over before attaching the heat duct and seat brace together.  Time to do the final glassing and joining the two parts.

Seat brace as it would be installed
on the heat duct width extensions


Onward,
cab

Sunday, May 20, 2012

Ch 6: Heat Duct & Seat Back Brace (Part 1 of 3)

Seat Back Brace
Step 2 of Chapter 6...boy, chp 6 has some big steps.  It's now time to build the keel of the aircraft.  This consists of the front heat duct that runs along the floor up to the instrument panel and a triangular seat brace that provides support for the seat back (duh!) but also houses  a map pocket for some storage, the fuel valve, and a mount for the manual landing brake lever.  I'm not installing the last two items here since I''m converting to an electric landing brake actuator and I'm moving my fuel valve to either the center console or the instrument panel where it's easier to see and use.

Note: Ignore the extra 2.25" added to the bottom (height)
of the Seat Brace Triangles.  I changed this later back to the
plans dimensions...read what I was doing below.
At the right are all the pieces to make the heat duct and seat back brace.  At the time of the picture I had already glassed one side and floxed in the birch triangular reinforcements per plans.  I suppose you could leave out the birch reinforcement if you're not using the manual landing brake, but I thought I would go ahead and install the pivot tube for the brake lever and possibly use it to engineer a fold down arm rest like the one below. (idea from Keith Spreuer)


Keith Spreuer's Folding Arm Rest

Wider Map Pocket
I'm making a small deviation from the plans here.  Checking the archives, I noticed a few folks who thought the map pocket was handy but needed to be wider as you couldn't get your hand in it to retrieve small items.  I thought if it was a little wider it could be used for a couple of water bottles...there is really no place in the front seat to put a water bottle and with a 1000 mile range, you might really need one.

There are two main changes to increase the width of the map pocket.  First, I doubled the width of the spacers (center of the picture) to 3" vs 1.5".  I picked 3" because that was about the size of a decent 16 oz. sports bottle.

Second...since the brace is no longer the same width of the duct, it won't sit on top of the 2" wide heat duct per the plans, it will fit over it with a gap between it and the duct.  So, in order to have it all fit properly, you either have to add height (2.25") to the bottom of the brace triangle so it sits on the floor but maintains the same height or you have to add some foam to the sides of the heat duct behind the seat wide enough for the brace to sit on top of.  I chose to make the brace taller and fill the .5" void on either side with foam.  (Update: I changed my mind during the process and decided to add foam to the sides of the heat duct so the brace could sit on top as the plans intended.)

1/2 of the seat brace showing the map pocket spacers.
(Note again that the seat brace has not yet been
cut back down to plans dimensions yet.)
First the map pocket.  Here are the spacers that form the map pocket laid out prior to floxing in place.  The map pocket is the space in the middle with the opening to the right (front of the aircraft).  This opening will be accessible vertically between the pilot and copilot's shoulders.  Note that in addition to being twice as wide (difficult to see in this picture), I also raised the top of the pocket an additional 2" making it 8" tall vs 6.25.  Looking at the plans, It didn't appear like the taller pocket would interfere with anything.


Detail showing built in wire channel

Wire Channel (TIP)
Look a little closer and you'll see one more thing I did...also picked up from the archives.  There is a double layer of glassed .25" foam at the back of the map pocket.  In the center, behind the glass, I removed a .25" strip of foam and inserted a straw from the bottom up to above the map pocket.  This will make it easier to allow for stringing any wires for a red flood light or intercom up through the brace without interfering with the map pocket.  The straw makes a nice smooth surface that won't chaffe any wires.

Note:  If I were to do it again, I would have made the wire channel .5" instead of .25".  I'm worried that I may not have made enough room for the wires that I might need to go through there.  With a .5" channel I could have used a McDonald's or Whataburger straw...they have a larger diameter than most.


Assembled Seat Back Brace
I give you the assembled seat back brace with a 3" wide map pocket instead of the 1.5" wide plans version.  It's now ready for final exterior glassing, attachment to the heat duct, and installation into Cozy #1606.
Seat Back Brace ready for exterior glassing
(Note:  now it's been cut back down to plans dimensions)

Onward to the heat duct.
cab


Tuesday, May 1, 2012

Ch 6: Installing the Lower Firewall...


Tape measure running straight from f-22 (extended outward) to the
firewall (extended outward) to ensure the 101.75" dimension
The lower firewall install took a lot longer than I thought it would, mostly because I'm too anal about some of the measurements.  The initial fitting was fairly good but I had to find a way to make sure the 101.75" dimension from F-22 to the firewall was maintained when floxed in place.  After leveling the fuselage upside down on saw horses, I clamped an extra 4 ft level to the aft side of F-22.

This allowed me to extend the back face of F-22 out to the side of fuselage far enough to allow for a tape measure to be pulled straight to another extension used at the firewall.  Without doing something like this your measurement will get distorted by bending around the fuselage or over the landing gear bulkheads and won't be accurate.

Using finish nails to hold
firewall in place while curing
I used small finish nails to hold the firewall in place once I got it where it was straight and square to everything else.  After many trial and error installs to get it square, my install process after putting on the flox was...

  1. install firewall loosely and gently tap into position which I had marked on the longerons; install holding nails
  2. adjust height by tapping with rubber mallet to ensure the proper water line positioning of the top of the lower firewall (w.l. 13.2") and the center of the motor mount hard-points (w.l. 4.5") using the top of the upper longerons as the known reference of w.l. 23"
  3. check the F.S. 101.75" position at the bottom longeron and tap to adjust as needed
  4. using a smart level, adjust the top of the lower FW (which is on the bottom now) until perpendicular (0.0 degrees or % slope which seems to be a slightly higher resolution)
  5. clean up excess flox and stand back so as not to accidentally hit it and move it

It took a while, but I think I ended up with a very accurately installed firewall.


Onward.
cab


Ch 4: The Firewall...Do We Really Have to Call it That?

     OK...momentum really re-building now.  I'm not getting work done every day by any means but I am spending some time Friday - Sunday at least.  The last two weekends I've jumped back and built (Chap 4) and installed (Chap 6) the lower firewall.  I held off on doing this earlier because I hadn't decided what to do about the infamous spinning screws in the firewall.  I finally decided to go with Click Bond studs for the rudder pulley brackets.  Since they install on the outside vice through the firewall, I don't have to worry about installing them for a while down the road.  If your not familiar with Click Bonds yet, see Infinity Aerospace for purchase and the Cozy Girrrls website for instructions on installation (look for the Click Bond link on the left side).

I cut out and glassed the lower firewall mostly per plans as well as the parts for the two rectangular sides.

TIP:  I say mostly per plans because I did enlarge the 1"x1" aluminum engine mounting hard-points to 1.5"x1.5".  Several builders have reported not having much margin to account for motor mount tolerances so enlarging the mounting locations provide a little more margin.


TIP:  Wait to cut out the longeron cutouts or the electrical conduit holes in the firewall until after you've established the true positions during Ch 6. using the fake firewall.  You can be somewhat loose cutting the longeron holes in the fake firewall until you get everything line up the way you want it.  Once situated, I glued popsicle sticks on the fake firewall around the edge of the longerons to form template I could use to mark a starting point for the cutouts in the real firewall.  Of course some minor adjustments were made as I fitted the real firewall but it worked out pretty well.

I'm waiting to cut out the top firewall because I haven't decided whether to make it wider and taller, ala Aerocanard, or not.   Al Aldrich from Aerocad was nice enough to send me .pdf files of the M-Drawing that has the Aerocanard firewall.  If I decide to go taller/wider, I can use that template and then be able to buy the pre-fab Aerocanard upper cowling to fit.  I've got a while to decide on this.  In the mean time, I need to sit in the back of a few different Cozy's to see how they feel.  I think I like to look of the standard turtleback better but builders have said the wider/taller turtleback offers much more headroom comfort for any back passengers.  Some builders have raised and widened the front but tapered it back to the standard firewall shape.  Much research to do still.

Onward.
cab