 |
| Eureka cut foam tip micro'd in place |
Since I'm using the Eureka cut foam cores, I already had foam cut to dimensions. Recall that when we installed the hinges, the L template had changed to hold the elevator at a 15 degree up angle instead of zero degrees. Well your supposed to use that old L template again here again to hold the elevator in place at the zero degree angle. The new L template isn't designed for that so you either have to make one or find some other way to hold the elevator in the right location.
 |
| Looking at trailing edge forward. Using the plans template with sticky back sand paper to carve out the tip shape. Duct tape protects the canard and elevator as you move it front to back. |
After attaching the foam blocks with micro, it's time to shape the top side. I found it very easy by turning the curved template from the plans into a sanding block. On the shaped end of the template I put sticky back sand paper past the point marked as the edge of the elevator. On the flat end of the template I put duct tape to the same thickness as the sand paper to prevent the sand paper end from going too far into the foam. By slowly moving the template front to back on the canard, while keeping the tape line at the edge of the elevator, I could let the sandpaper do all the work. As I got closer to the elevator, I taped some craft sticks to the top of the elevator so that my sanding would flow straight back to the trailing edge and not create a drop down at the canard trailing edge to elevator junction. Then I removed the craft sticks and gently faired the slope down to better match the trailing edge of the elevator. I did the exact same thing on the other side and they both came out exactly perfect.
I also had to decide on how the leading edge of the tips would curve to the sides. I randomly chose a big roll of tape I had as the template for the curve. I did my best to mark a matching curve from the leading edge around to the side, sanded it to my liking, and then made a template of it to help me match the other side. Worked like a charm.
 |
| Perfectly shaped canard tip - top side. |
Bottom side
I flipped the canard over and began shaping the bottom of the tips. This is when I realized I probably didn't interpret the plans correctly when shaping the top side at the leading edge. The plans are somewhat vague, but apparently I should have rounded the top edges near the leading edge so that the glass will conform around it and the bottom can overlap it. I rounded the corner, looking at it from above, but did not round the top down to the side. However, I think I like my way better. It leaves a hard edge on the topside that blends into the swoop nicely. Since I couldn't overlap the glass except on the very front, I had to make some flox corners along where the two glass edges would meet to ensure strength and durability...no big deal. Just another way to do it.
 |
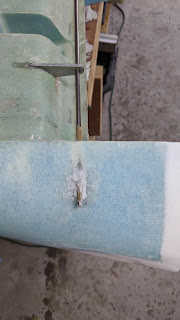
| Elevator hinge pin wrapped with box tap and packed with micro. |
So, my plan B was just to wrap the hinge pin with thin box tape, wipe it with some Vaseline to keep it from sticking, and pack micro around it. That worked pretty well.
 |
| Completed Canard Tips. Yo can see the hard edge running from the front all the way back to the swoop. Should be a little unique out on the ramp. |
Now we have finished the canard tips. Only one more thing to do to call it complete.
Onward!

No comments:
Post a Comment